Master the Whiteout Survival Barricade upgrade path and defense strategies to stop fire damage, offline decay, and forced teleports.
Let me tell you, the Barricade is not just some fancy wall you ignore until the wrong person comes knocking. In Whiteout Survival, it is the beating heart of your city's survival, and after more than a few fiery wake-up calls in 2026, I treat it like the crown jewel it is. The moment your city gets hit, the Barricade catches fire for 30 minutes, and every extra attack stacks more burn time onto that blaze. It sounds dramatic—and honestly, it is—but that fire is also your buffer. The problem? While you are offline, the Barricade's health drops faster than a newbie's shield during a server war. This guide is my hard-earned playbook for keeping the walls up, the invaders out, and your city right where you left it.
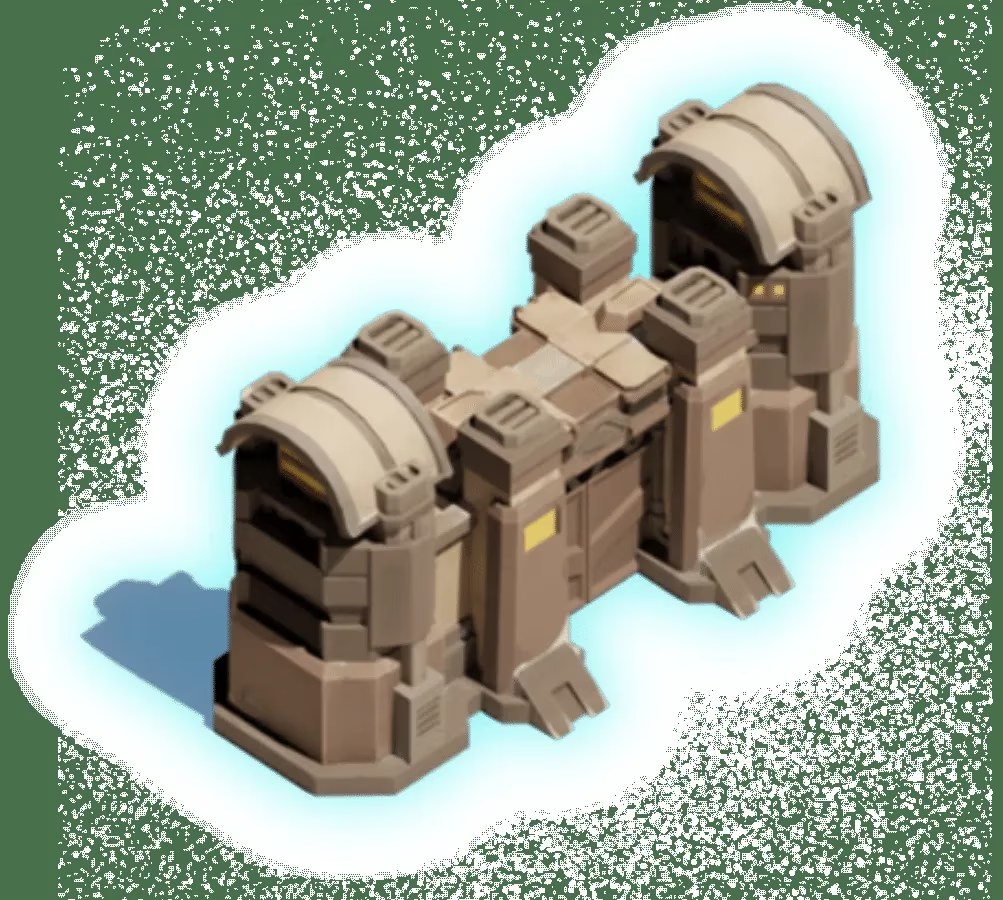
What the Barricade Actually Does
I will not sugarcoat it: your Barricade is a magnet for punishment. Each successful enemy attack lights the thing up for a 30-minute burn, and repeated hits can extend that timer longer than a queue for a new server. During that time, I estimate the flames eat away at around 12 health points per minute. If you are away from the game, the decay hits even harder, which is why offline defense is the name of the game. Should the health bar hit zero, the game yanks your city off the map and drops it into an unpredictable location. That forced teleport might save your resources from total ruin, but you can kiss every hard-won territory perk goodbye.
Thankfully, you have a few ways to patch things up. Inside the City Defense tab, the Restore Barricade action can refill up to 240 health every 30 minutes. I have also seen reports of full Barricade restoration after a forced teleport, though I would not bet the farm on that being a permanent feature. In my book, prevention beats repair every single time.
Upgrading: The Long Game Pays Off
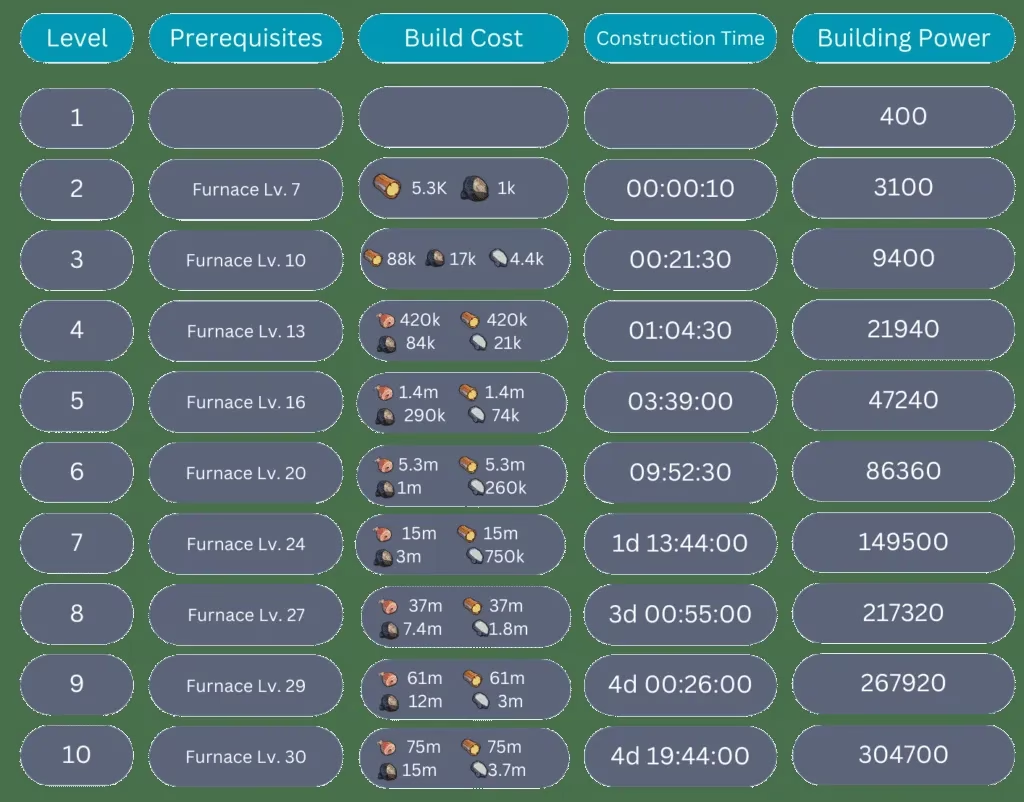
If you want your city to survive the long haul, do not sleep on the Barricade and Furnace combo. You need at least a level 7 Furnace to begin upgrading the Barricade, and pushing the Barricade all the way to level 10 requires a beefy level 30 Furnace. Each level demands Wood, Meat, Coal, and Iron, and the costs climb faster than a polar bear up a glacier. Upgrade timers also get seriously long, so plan ahead if you do not want to be caught with your defenses in limbo.
From level 4 onward, every Barricade upgrade adds a chunky 5,000 points to its durability. That may not sound flashy, but it is a lifesaver when you are offline and someone tries to burn you down. Pair those upgrades with Furnace improvements and your city power rating climbs too, which can make an attacker think twice before poking the bear.
Defensive Strategies I Swear By
A strong Barricade is only one piece of the puzzle. I have learned the hard way that layered defense wins wars, so here are the moves that keep my city off the relocation express.
Hero Lineup
Tap the Barricade, open City Defense, and assign your best Infantry, Lancer, and Marksman heroes to the three slots. Do not forget to save the lineup. A balanced hero mix gives your defenders the edge when the flames start rising.

Counter-Recon and Troops Defense
Counter-recon is my favorite little trick for competitive PvP. It hides your city from enemy scouts, so they cannot size you up before a raid. You can grab it for 2 hours, 8 hours, or 24 hours, and the 24-hour version costs 4,800 Gems. For extra muscle, the Troops Defense boost gives you either a 10% defense bump for 2 hours at 2,000 Gems or a 20% bump for 12 hours at 20,000 Gems.
| Protection Option | Effect | Cost/Duration |
|---|---|---|
| Counter-recon | Hides your city from scouts | 2h, 8h, or 24h; 24h costs 4,800 Gems |
| Troops Defense Boost | +10% or +20% defense | 2,000 Gems for 2h, 20,000 Gems for 12h |
| City Protection Shield | Blocks incoming attacks completely | 2h, 8h, or 24h; 24h costs 4,800 Gems |
| Random Teleporter | Moves your city to a random spot | 1,000 Gems each or rechargeable |
| Advanced Teleporter | Lets you pick the destination | Earned or purchased |
Storehouse, Infirmary, and Research
A pimped-out Storehouse is a must-have because protected resources cannot be stolen. Tap the building and check Details to see exactly how much is safe. The Infirmary is just as important; if your severely wounded troops exceed its capacity, the extras are gone for good. Upgrade it, then research Ward Expansion and Bandaging in the Growth tech tree to boost healing. On the Battle tech tree, early priorities like Defensive Formations, Shield Upgrade, Survival Techniques, and Special Defensive Training keep your troops from folding under pressure.
Alliance, Shields, and Teleporters
A top-tier alliance with a no-aggression pact, or NAP, is a massive safety net. Members and their farm accounts leave each other alone, which means fewer headaches and more time to grow. For solo safety, City Protection Shields are the gold standard. The game hands you five free 8-hour shields with a 7-day cooldown, so use them wisely. You can also buy shields through the City Bonus menu; the 24-hour option costs 4,800 Gems. If you need to vanish, Random Teleporters are your friend, while Advanced Teleporters give you full control over the destination.
Military Might
Never underestimate a scary army. Upgrade your Infantry Camp, Lancer Camp, and Marksman Camp to unlock better troops and train more of them. Once any camp hits level 13, promote your units to boost their combat power dramatically. A city that looks ready to throw down is a city most raiders would rather skip.
Final Thoughts
At the end of the day, the Barricade is your city's first impression and last line of defense rolled into one. Keep it upgraded, restore it early, and layer it with heroes, shields, tech, and a strong alliance. In Whiteout Survival, the cold is relentless, but a prepared player is colder still. Stay sharp and keep your powder dry.